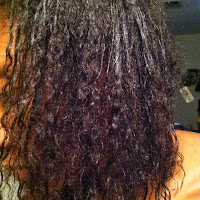
I have finally fixed my under processed hair! It took some serious research and work but I did it and I couldnt be happier! I had been struggling with my under processed hair for a very long time. I was what I called "accidentally texlaxed". Texlaxed is when relaxed hair still has "texture" or a wave pattern to it when its wet. I did not want my hair to be like this so it was an accident; I was doing it to my hair without knowing. This is what i was doing that made my hair texlaxed:
- NOT using enough relaxer
- NOT using a strong enough relaxer
- NOT smoothing down my new growth while the relaxer was on
- NOT leaving the relaxer on long enough to "take"
 |
| Texlaxed hair shows when wet then air dryed |
 |
| My hair was straight in some areas, and wavy in others (air dried) |
I had to take charge of my hair so I started doing a lot of research and came to the conclusion that I needed a "corrective relaxer" A corrective relaxer is just a term that means you will relax over previously relaxed hair, from your roots to the ends because you need your hair to be one, smooth texture from root to end. You Must be VERY careful when doing this. You must wait at least 4 weeks after your previous relaxer before you attempt this. GO TO A HAIRSTYLIST if you can. Let them know your situation and what you desire. They would know the best method, products to use, and how long to keep the relaxer on your hair. If you are attempting this at home, don't be afraid, YOUR HAIR WILL NOT FALL OUT IF YOU DO IT RIGHT! I read up that it is best to use a lye relaxer for a corrective, instead of a no-lye. Here is a list of products I used:
- Dr. Miracles Lye "No Base" Relaxer in Super
- ISOPLUS neutralizer shampoo
- ORS Olive Oil Replenishing Conditioner
- Mizani Thermasmooth Shampoo
- Optimum care Heat Protector polisher
- Dark & Lovely Natural Black semi-permanant dye (optional)
- Relaxer brush
- 2 shower caps
- Hair ties
- Wide tooth comb
- Flat iron
- Patience (lol)
This is all the steps I took for my corrective relaxer:
 |
| hair dampened then air dried |
1)Damp hair-I damped my hair with water so it would curl up so I could see where I needed the most work. It was my roots and my ends.
2)Prep-I got my Dr. Miracles "No Base" relaxer in Super strength and prepped my hair for my relaxer (used Vaseline around my edges, ears, so on...)
3)Apply-I covered my shoulders with a towel, sectioned my hair in 4 sections (2 in the front and 2 in the back) and began brushing on heavy amounts of the relaxer with my relaxer brush on the areas that needed it the most FIRST.
4)Let process- I let that sit for about 3 minutes, then applied the relaxer on my entire head BUT NOT directly on my roots and scalp.
 |
| Hair covered in relaxer |
5)SMOOTH!- I scooped up and smoothed the relaxer from a couple of inches away from my scalp, on to the very ends. I constantly smoothed for about 10 minutes. You must smooth to stretch your hair and get all the wave out!! I ran a small tooth comb down my hair, detangling from the ends first, up to the root. I also pressed down my roots with the opposite side of the comb to smooth my new growth when I got to that section last.
6)Neutralize-After smoothing, I rinsed and washed my hair 3 times with neutralizing shampoo (sold separately from the No Base Lye Dr. Miracles relaxer)
7)Deep Condition-After all the relaxer was out, I did a deep condition over night. I applied my ORS conditioner, put a shower cap over my head, put a silk scarf over that, and let it sit.
 |
| Deep condition |
8)Wash...again-This step is optional but after rinsing out the conditioner the next morning, I washed my hair with the Thermasmooth Shampoo from Mizani. This shampoo has a special smoothing complex that I think would help my hair.
9)Color (optional)-I wanted to color my hair dark black so at this point, my hair was damp from the wash, so I applied my Dark & Lovely semi-permanent natural black hair color all over my head. I put on a plastic cap, sat under an over head dryer (optional if you don't have one), then rinsed.
10)Smoothing Serum (optional)-I applied Mizani thermasmooth serum on my damp hair (from the coloring).
 |
| After blow dry |
 |
| Detangle often! |
11)Blow dry-I completely blow dried my hair and wow did I see results already!!!
12)Heat protector (optional but recommended)-I applied a heat protector/flat iron serum to directly to the sections before flat ironing. I used a brush and a small tooth comb to help press out my hair.
13)Style as desired-I as so happy with my results!!!!!
 |
| Yay me!!! |
Im SO glad I did this because now I have the smooth, frizz free hair that I wanted. Although it will never be PERFECT hair, its much better than that poodle hair I had! I hope you have a safe, successful hair journey!!